COMBATT:
THE NICAD DISCHARGER
SOME OF THE COMPONENTS MAY
NO LONGER BE AVAILABLE!
 It's a few years since the COMBATT discharger was
first developed (pre-1993) and I guess the electronic side has
moved on a bit since then but here it is in any case. Any
programmers out there please forgive the poor programming in
Basic but we are amateurs and have no training. If anyone takes
the source code and does something better with it, let's know
about it, we'd like a copy. It you decide to have a go and make
one ONLY get in touch to tell me it's working perfectly (!) since
I can't offer any sort of repair or information service.
It's a few years since the COMBATT discharger was
first developed (pre-1993) and I guess the electronic side has
moved on a bit since then but here it is in any case. Any
programmers out there please forgive the poor programming in
Basic but we are amateurs and have no training. If anyone takes
the source code and does something better with it, let's know
about it, we'd like a copy. It you decide to have a go and make
one ONLY get in touch to tell me it's working perfectly (!) since
I can't offer any sort of repair or information service.
YOU MAKE AND RUN
THIS DEVICE AT YOUR OWN RISK, WE DO NOT ACCEPT ANY RESPONSIBILITY
FOR DAMAGE TO YOUR COMPUTER THAT MAY OCCUR.
Design and
program by Graham Woods and David Woods
HOW
IT WORKS
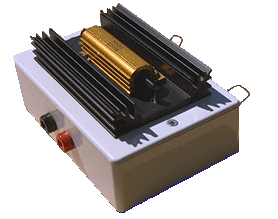
The NiCad discharger is quite
simple in its operation, your NiCad pack is simply discharged
through a large 50 watt resistor. As the NiCad discharges, your
computer 'samples' the voltage of the battery pack on load, and
marks a series of red points on your screen, i.e. it draws a
line. At the point when the pack voltage just dips below 1 volt
per cell (4 volts for 4 cells, 8 volts for 8 cells and so on)
your computer will automatically stop the discharge of the pack.
In this way the NiCad pack is 'flattened' safely without going
too far. Of course, you could carry out exactly the same
procedure yourself with a voltmeter, a pencil and a piece of
paper but you would have to monitor the discharge yourself, so
why not let your computer do it for you?
The COMBATT discharger has one
other important advantage - it records all those points as it
plots the discharge graph on screen and saves the voltages as a
file. And once you have a set of files on the same, or similar,
NiCad packs you can compare them on screen or off, that is to
say, monitor the performance of all your NiCad packs whether they
be receiver batteries or electric flight packs. This is where the
name COMpare BATTeries comes from, BTW.
WHY
DO I NEED TO MONITOR NICAD PERFORMANCE?
You don't, but if you have a
mind for safety, your pocket and your time, it is wise to have a
model aircraft that will not crash for lack of care; batteries
can suffer through misuse and second only to poor piloting as the
reason for crashes (IMHO). If you fly electric, then you will
naturally enough always be concerned with cell performance as
well, especially if you have a large number of expensive NiCad
packs. Looking at the shape of the discharge curves may also help
you to identify faulty packs too.
NICAD
BATTERY CYCLING
We've all done it - flown for an
hour on Sunday afternoon, forgotten about the model until the
next Saturday evening and then put the transmitter and receiver
batteries on charge all night. They still work but as you know
from various magazine articles, repeated 'topping up' of Nicads
without discharging them first does them no good at all - they apparently
can develop some sort of memory. My own transmitter cells
suffered from this very phenomenon; in the end my tranny ran only
for an hour and a half before the bleeper sounded for a flat
battery when it should have gone on for much longer.
Discharging NiCad cells fully
and then recharging (cycling) them can break this nasty 'memory'
habit. Using the COMBATT unit enables you to cycle your cells
simply and compare the results as you go through a number of
charge and COMBATT discharge cycles. The performance of cells
often increases after they have been cycled only one or twice,
see my graphs below.
NICAD
CELLS
The charge and discharge rates
of NiCad cells are expressed as multiples of their nominal
capacity 'C' - the hourly rate of discharge. Thus, if a cell has
a capacity of 1.2 Ah then charging or discharging at a rate of
1.2 amps for one hour, the 'hourly rate' would be called 1C.
Consequently, discharging at five times the hourly rate, 5C - the
cell would last for only around 12 minutes and discharging at a
fifth of the hourly rate, C/5 - the cell should last for 5 hours
or so.
Discharging cells at these
different rates results in capacities of NiCad cells departing
from their nominal values. A cell discharged at a low rate will
obviously last longer than one which is discharged at a higher
rate but the absolute capacity of the cell also changes according
to its discharge rate (and the way in which it is charged). The
capacity varies so that discharging at 1C should give the cell a
capacity to 100% of its nominal capacity, the higher 5C discharge
rate will yield a lower capacity of and slow C/5 discharge rate
may well show a higher capacity than the nominal capacity - for
example 105%. 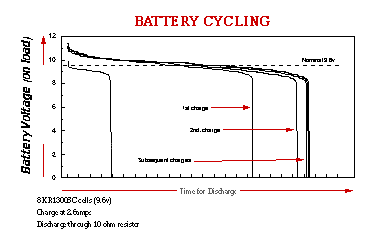
In order to measure a realistic
set of capacities for a range of different pack voltages and cell
capacities large wattage (expensive) discharge resistors would
have to be tailored to suit each and every battery pack. Not only
that, each resistor would have to have its own associated
electronics as well and the circuit would be more costly. The
COMBATT discharger gets round this problem because it is ONLY
DESIGNED TO COMPARE the capacity of similar NiCad packs or the
same NiCad packs over and over. For simplicity (chosen, bearing
in mind the time taken for discharges) it uses one 10 ohm, high
wattage resistor to discharge all your Nicads. All discharges are
made through the same resistor, under the same conditions. (and
hopefully the same wires and connectors)
Because of what I have written
above, and the fact that batteries are not completely flattened,
the stated capacity that shows on the screen will not therefore
be the absolute capacity of the pack. It is a figure for you to
compare the next time you discharge the same pack or a similar
pack.
Let's look at an example:
Your TX Nicad may be 8 cell/600
maH - discharging through a 10 ohm resistor means the hourly rate
will be 1.6C and may show quite a low reading of the nominal
capacity, say for example 85% or 90% of the nominal capacity. If,
however, you are discharging an 8 cell/1800 maH electric flight
pack the C rate will be 0.53C and may well give a higher reading,
say over 100%, of the nominal capacity for new cells. Some good
packs can show capacities of well over 100%.
The way in which you charge your
cells also has an impact on the 'capacity' of your NiCad packs -
a long overnight charge at C/10 + 40% or 50% (the normal way RX
& TX chargers charge) will often give you a higher capacity
than with a fast, high current, Delta peak charger. Then again,
charging electric flight cells with a temperature controlled
charger, getting your cells sizzling up to 45ºC, will render a
different capacity again. The temperature of the pack during
charge and discharge also has its effect on its capacity. A value
of battery capacity then, doesn't really mean very much
considering all the variables that packs of cells are subject to.
Comparisons of similar packs of cells or the same pack of cells
over and over is more meaningful and the COMBATT discharger
enables you to do it more easily.
EXAMPLES OF HOURLY RATE &
ESTIMATED DISCHARGE TIMES
|
| # Cells |
Nominal Voltage |
Capacity mAh |
Hourly Rate (C) |
Discharge time
(typical) |
| 4 |
4.8 |
225 |
2.1 |
28 min |
| 4 |
4.8 |
600 |
0.8 |
75 min |
| 5 |
6.0 |
1200 |
0.5 |
120 min |
| 5 |
6.0 |
1700 |
0.35 |
170 min |
| 6 |
7.2 |
1200 |
0.6 |
100 min |
| 6 |
7.2 |
1400 |
0.5 |
120 min |
| 7 |
8.4 |
1200 |
0.7 |
86 min |
| 7 |
8.4 |
1400 |
0.6 |
100 min |
| 8 |
9.6 |
600 |
1.6 |
37 min |
| 8 |
9.6 |
1200 |
0.8 |
75 min |
| 10 |
12 |
1200 |
1.0 |
60 min |
| 10 |
12 |
1800 |
0.66 |
91 min |
RESOLUTION
When/if you have been playing
with the data files (plotting graphs) you may notice that the
same voltage values (or numbers) crop up time and time again.
This is due to the fact that the COMBATT unit uses an 8 bit
analogue to digital converter; because of the way the circuit
works the NiCad packs are sampled in 60 mV (0.06 volt) steps.
Greater resolution (i.e. smaller voltage steps) could be obtained
if a 10, 12 or 16 bit A/D converter were used but some of these
I.C.'s are much more expensive (tens of pounds each at the time
of writing a couple of years ago), sometimes need an extra 12
volt power supply, and are not necessary for this simple circuit.
For the same reason, the graphs of low voltage and higher voltage
packs will appear slightly different on the screen. The time
taken to discharge various packs will depend on their nominal
capacity. The program does a calculation to divide the estimated
total discharge time by 600 to give up to 600 values of sampled
voltage. The sampling interval is shown on the screen.
Those of you experienced in
electronics will see that not all the current from the
discharging NiCad pack goes through the discharge resistor some
it is used to power some the circuit itself. While the IC1 is
powered from your computer's power supply, current for other
devices is derived from the discharge NiCad itself. The Mosfet
TR1 is of the same type as is used for older electric speed
controllers, has a very low resistance and drops very little
voltage and, for all intents and purposes, hardly affects the
capacity readings. D3 and IC2 are there to provide some
protection to your computer should you do something silly.
HOW
MANY CELLS WILL THE UNIT HANDLE?
The COMBATT unit was originally
designed to discharge model aircraft 4/5 cell receiver and 7/8
cell transmitter NiCad battery packs. It will, however, handle
from 4 to 10 cells with capacities from 500 mAh to 1800 mAh (or
higher) - a range that covers most needs. 225 mAh cells can also
be discharged but the 'hourly rate' will be around 2C - although
this may be too high a rate for some of these smaller NiCad
cells. Not recommended for 110mAh cells either.
FILE
MANAGEMENT
As mentioned earlier, the
discharge data (up to 600 values) is recorded on file with the
filename that you give the NiCad pack. I suggest you use the name
of the model and a number. e.g.. Cherry1 for the first time you
discharge the pack. The data will be saved as: A, B, C, D, E or F
*:\Combatt\Cherry1.dat depending on the drive you choose. The
second time you discharge this pack you would generally opt for
the name Cherry 2 and the data will be saved as a completely new
file. In this way similar files are grouped together in the file
list.
GRAPH
PLOTTING
The created data (.dat files)
can be imported into many programs such as Lotus 1-2-3 or Lotus
Freelance Graphics, Paradox, Excel etc. to produce customised
graphs. On the other hand, if such programs are not available to
you, there are various Shareware alternatives. The other way to
obtain a hard copy of the graph is simply to use the PRINT SCREEN
option on your own computer or use ALT + PRINT SCREEN and grab a
copy of the screen to the Windows Clipboard and paste it into a
graphics program.
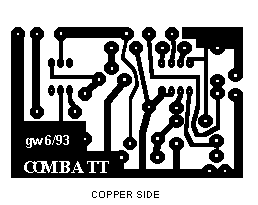
CIRCUIT
CONSTRUCTION
Making the COMBATT UNIT is quite
an easy thing to do for most modellers but of course there are
the usual warnings that go with static sensitive devices. Use a
small, fine tipped soldering iron, not heating the components too
much - do not solder all IC pins one after another! Rotate the
soldering. Make sure you get the polarity and/or alignment of all
components correct before soldering - see circuit diagram for
pin-outs. (Clean your PCB with a scouring pad and use a 1mm drill
for the holes.)
COMBATT
COMPONENT LIST
|
| Component |
Value |
Description |
| R1 |
15 k ohm |
Metal Film Resistor |
| R2 |
1 k ohm |
Metal Film Resistor |
| R3 |
10 ohm/50 Watt |
Discharge Resistor |
| R4 |
3.3 k ohm |
Metal Film Resistor |
| VR1 |
100 k ohm |
Cermet Preset Resistor |
| C1 |
10 µF/35 volt |
Tantalum Capacitor |
| C2 |
0.1 µF |
Ceramic Capacitor |
| D1 |
1N4148 |
Signal Diode |
| D2 |
1N4148 |
Signal Diode |
| D3 |
BAT42 |
Schottky Diode |
| TR1 |
BUZ11 |
Mosfet Transistor |
| REF1 |
REF25Z |
Voltage Reference Diode |
| IC1 |
TLC549IP |
A/D Converter |
| IC2 |
(WL35Q) |
Opto Isolator |
| Hardware |
--- |
DIL 8-pin Socket |
| Hardware |
--- |
PCB pins |
| Hardware |
--- |
Heatsinks (R3/TR1) |
| Hardware |
--- |
Red and Black Scockets |
| Hardware |
Centronics |
36 way Chassis Socket |
These components
should be available in the UK from Maplin, Farnell, CPC, and R.S.
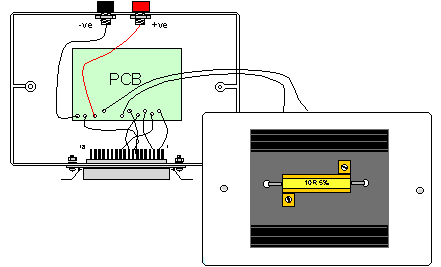
The large discharge resistor is
mounted on the heatsink which is fixed on the outside on the top
of the unit using 3mm nuts and bolts for mounting both heatsink
and resistor together - use thicker wires for the connections to
R R on the PCB for they may carry more than 1 amp. [Warning: The
discharge resistor gets very hot with larger packs (8, 9, 10
cells) since it has to dissipate up to 20 watts.]
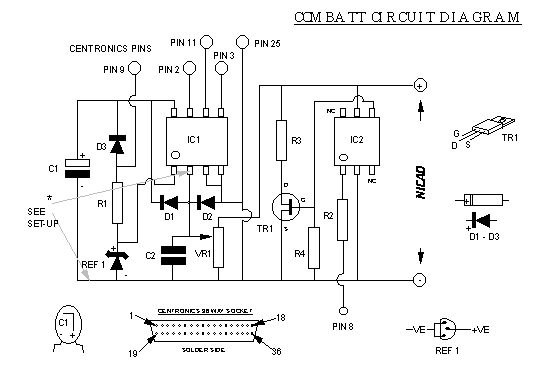
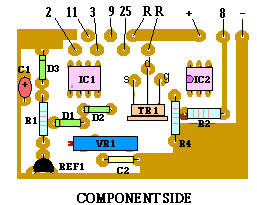
- The PCB soldering is
simplicity itself - use the socket for the 8 pin IC - pin
1 (the round mark) should be at the bottom left hand
corner (looking from the component side).
- IC2 (6 pins) has the
semi-circular mark on the left (component side)
- Get the diodes D1, D2, D3
and capacitor C1 round the correct way - the black band
is +ve.
- Resistor values: R1 -
brown, green, orange; R2 - black, brown, orange;
- R3 - gold coloured; R4 -
orange, orange, red
- TR1 has three leads - g
(gain), s (source), d (drain) - observe correct polarity.
- REF1 (the smaller of the
two three pin devices) has the two negative outer leads
connected together.
- Use the ten PCB pins for
flying leads: 6 to the Centronics 36 way, 2 to R3, 2 to
+ve & -ve.
- The multiturn potentiometer
needs to be wound in a few turns from the screw end so
that the ratio of resistance is about 1:5
SETTING
UP THE UNIT
- In order to calibrate the
COMBATT discharger you will need a digital multimeter and
do a simple calculation.
- When you are sure the
circuit wiring is correct, connect a 4.8v NiCad pack to
the unit and measure its voltage across the +ve & -ve
terminals of the unit.
- Now do this simple
calculation: Calculated voltage = Measured NiCad Voltage
divided by 6 (for example: 5.13 /6 = 0.855).
- Next plug in your computer
printer cable into the Centronics socket to power up the
circuit from your PC. Do not run the Combatt program!
- Locate pin 2 of IC1 (where
the centre pin of the pre-set goes). See circuit diagram.
- Put the red multimeter
probe on pin 2 of IC1 and the black probe on the -ve
terminal.
- Twiddle the pre-set
resistor, VR1, slowly until the voltmeter reads your
Calculated Voltage (above). In the case of our example
above: 0.855 volts or as close as you can get to it. The
resolution of the blue Cermet pre-set VR1 should enable
you to get very close to your calculated voltage.
- Exact comparison of the
NiCad voltage on screen with the voltage using a
multimeter is not very meaningful since the screen
voltage will be changing continually in +/- 0.06 volt
steps. Try and get as close as possible when setting up -
have a few goes at doing it.
COMBATT - THE
NICAD DISCHARGER
page #2
RUNNING
COMBATT
When you have finally completed
your COMBATT unit please do double check all you connections,
remember you will be connecting it to something worth hundreds of
pounds and I cannot take any responsibility for any damage you
may cause to your computer, equipment or Nicads.
There are a couple of safety
devices to protect your equipment and we are only working with up
to 12 or so volts, so there shouldn't be any problems.
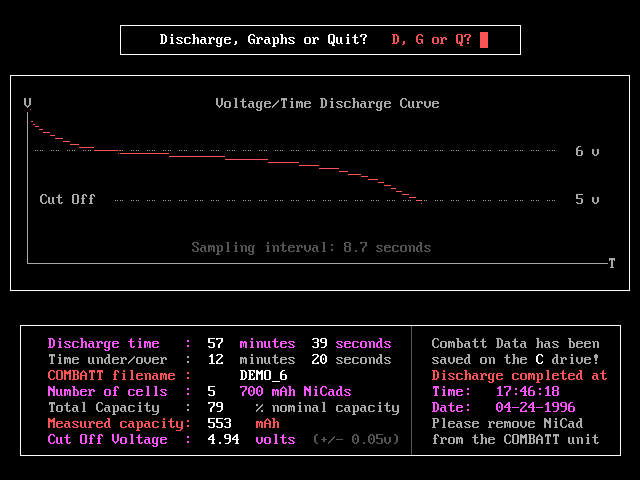
DISCHARGING
A NICAD
- Unplug your printer from
the parallel cable and plug in your COMBATT unit.
- Always use the same leads
for your discharges, use low resistance (thick) wires,
keep them as short as possible.
- Plug in your NiCad, get the
positive and negative connections round the right way -
if you have a charging socket to use for your battery
connectors, so much the better.
- Run the program. Pick the
drive (A, B, C, D, E, F) where you want the file to be
stored.
- Choose Discharge (D).
Answer the three questions about the pack and press ENTER
each time, the last ENTER will start the discharge.
-
to enter NiCad Capacities in Ah and NOT mAh
- When the COMBATT discharger
is running you should immediately one red pixel on the
left of the graph screen by the axis line near the top.
- The program will have
estimated the time of discharge for a perfect NiCad from
the numbers you have entered: two clocks will be running
- a count down and count up. These are only to be used as
a guide.
- The number of cells of the
Nicad pack and drive will be displayed.
- The % so far of nominal
capacity will be displayed. The measured voltage of the
NiCad on load will be displayed (remembering that the
voltages go in steps of 0.06 v.)
- The measured capacity in
mAh will be displayed.
- As the program slowly
samples the maximum 600 values of battery voltage a line
plot of the voltage/time curve will appear in red.
- Every so often data will be
transferred to your hard drive or floppy disc and the
drive light will flash briefly.
- When the on-load voltage of
the NiCad just dips below the 1 volt per cell value (for
two samples) the program will stop the discharge and a
horn will sound.
- After the horn has stopped
the time and date taken from your system clock will be
displayed so make sure you have set the time and date
correctly.
- The time, date, measured
capacity, nominal capacity, sampling interval are added
on to the end of the data file. (the nominal voltage is
added as the first number in the datafile).
- If you subsequently use a
graph plotting program for your data these values will
either have to be removed manually or with the range
settings of the graphing program. [If you don't the ends
of the graph will appear in a funny way!] Use Notepad in
Windows.
- If you press ESCAPE there
will be a few seconds delay before it comes in, you will
then be given three options - Discharge, Graph, Quit.
- Aborted discharges although
stored, in part, on disc cannot be subsequently be
displayed on screen and should be erased using a text
editor or the program itself.
TYPICAL
SCREEN SHOT OF COMPLETED DISCHARGE
The screen shot below shows the
classic shape of a NiCad discharge although different types of
cells (SC, SCR, SCE etc.) will exhibit slightly different shaped
curves. SCR type cut-off cells show the classic (vertical) cut
off with the pack voltage dropping off abruptly (see second graph
below), other normal (let's say) NiCads like the one below trail
off as they reach the cut off point. Some of my maltreated
batteries exhibit strange behaviour as they approach the cut off
voltage showing a slight recovery, this is probably due to the
performance of individual cells not being matched. Nickel Metal
Hydride cells have similar graphs, BTW.
DISPLAYING
YOUR COMBATT VOLTAGE/TIME CURVES ON SCREEN
Choosing the option for Graphs
(G) will allow you to display up to eight of your previous files
simultaneously exactly in the way they first appeared on screen
during discharge.
Simply type in the name or
number of the NiCad pack you used to identify the discharge,
press ENTER, and the line will plot on screen. To compare another
Combatt file, type a second name, press ENTER, and that will
appear on screen as well, and so on up to eight different files
in different colours.
Other data about the discharge
is also retrieved from the files and displayed on screen in the
form of a table. See screen shot.
If you press RETURN (enter) on
its own at any time while in the graph screen you will be able to
opt for Discharge, Graphs or Quit.
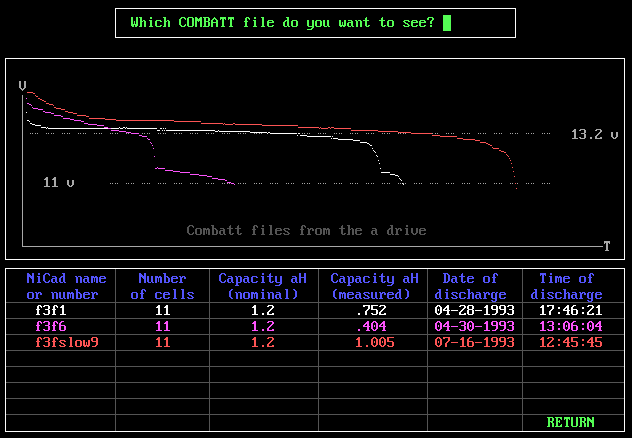
The second screen
shot above shows the graph page. Here I have recalled 3
discharges of the same pack (3 for clarity but it could be up to
8) and placed them all on screen together. Each discharge line
and its data are displayed in a different colour. All the
information you need to know is stored in the files and displayed
on screen in the form of a table. In this example you can see the
apparent pack recovery mentioned earlier quite clearly.
LOOKING
AT FILES
Opting to inspect your Combatt
Files (F) is quite a useful feature if, like me, you have a lot
of discharges stored. Once you have been using your discharger
for a little while, keeping track of what number you reached with
different packs becomes difficult. This function simply locates
all files with the .dat extension in the Combatt directory and
displays them on screen with the date and file size.
ERROR
HANDLING
- There are several timed
error handling routines and screens in the COMBATT
program.
- In discharge mode, if you
try to name a new file with a filename you have already
used for a discharge the error message FILE ALREADY
EXISTS will appear. Your existing COMBATT files will be
displayed on screen. You then have the option of erasing
such files if you wish.
- In graph mode, if you try
to display a COMBATT file that doesn't exist the error
message FILE NOT FOUND will appear. Your existing COMBATT
files will again be displayed on screen.
- Using more than eight
characters or illegal characters (* ? / " ; > :
ETC) you then have the option of trying again.
- If you try to store or
retrieve information on disk and there is no disk in the
drive the message THERE IS NO FLOPPY DISC IN DRIVE will
appear.
- If there is no directory
called COMBATT on floppy or hard drives (or you chose a
non-existent drive) the program comes up with the error
message PATH NOT FOUND or THERE IS NO DIRECTORY CALLED
COMBATT. You will then have the choice of creating a
directory or changing disk drive.
- If there is any other type
of error the error message UNDEFINED ERROR will appear
and the program will close in five seconds. (An example
would be if you tried to display an aborted COMBATT file
- such files cannot be displayed for they contain
insufficient information.)
In practice, you
may, of course, like to initiate the first two error messages
yourself in order to view all of your previous COMBATT files on
the disk/drive you are using instead of going to one of the other
file listing/editing facilities to be found on your computer.
NICAD
ANALYSIS
So how do we interpret our
Combatt discharges apart from the obvious capacity readings?
There are several things to take note of, the first being the
method of charging. Going right back to the beginning: there are
three ways of charging a NiCad battery:
1) Fast charge - using voltage
detection to stop the charge,
2) Temperature charging - a
variation of 1 except that the temperature of the cells is used
to abort a charge and
3) Slow or trickle charging.
Slow charging (e.g. C/10 + 50%)
generally gives the best results, your cells may receive a higher
charge than with a fast charge. Voltage and temperature detect
fast charges can give an inferior charge so remember how the
NiCad was charged when analysing your discharge graphs.
Temperature also has an effect on charging. Compare Like with
Like. Always use the same leads for comparison discharges for
wires and connectors have resistance of their own. Try charging
your NiCads in different ways, at different rates, or for
different times to find the best charge. If you have other
NiCads, such as for a Camcorder, CB, CellPhone, Ham radios,
Scanners or Laptop give them a go too.
What does the graph of a good
discharge look like? Well, first off it should be smooth and not
like the one I have shown above - the one shown is obviously
faulty in some way because of the shape of the curve - that
little bump at the end. The second thing is to look for a graph
where the discharge line plot stays above the nominal voltage
dotted line for as long as possible - for at least 50% of the
time; i.e. it holds up under load. It should also be as high
above the nominal voltage line as possible.
If you think about, it the area
under the curve is the measure of capacity. [The vertical
axis, although recording voltage, is, in effect, also recording
the current flow through the fixed 10 ohm discharge resistor (E =
I x R e.g. 8.4 volts = 840mA x 10 ohms) and area = length times
height so the area under the curve is a measure of the capacity -
i.e. mA times time in seconds/60 x 60 mAh.]
If we were
discharging at constant current we would be looking for a graph
that reached as far across the screen as possible but we're not.
In our case though, the discharge current is not constant but
varies from high to low with the voltage so that we are not
merely looking for a discharge that reaches as far to the right
of the graph screen as possible - we are looking for a graph that
covers the maximum area under the curve. We could have a
situation where the capacity of two NiCad packs reads the same
but one has a 'higher' line plot and yet only reaches part of the
way across the screen that the other one does with a 'lower' line
plot. The better pack is the one with the higher line plot.
AND
FINALLY...
I hope that you do not have any
problems with the construction of the COMBATT unit or the
program. The unit has a small electronic component count (14) and
is easy to make for experienced modellers with a small soldering
iron and simple tools. More sophisticated versions, a greater
number of cells and/or better resolution could have been made but
it was felt that keeping the whole thing as simple as possible
would mean a low price. Increasing the number of cells that can
be discharged increases the problems of heatsinking and large
resistors. Higher discharge rates would also bring the same
problems. Lower rates of discharge would mean that packs of cells
would take 'forever' to discharge. In writing our quirky program
we hope almost every eventuality has been taken into account. We
welcome any positive feedback you may have.
The COMBATT unit is a sensitive
device and can be subject to interference under certain
conditions. Use a short length, quality printer cable rather than
a ribbon cable for connecting the unit to your computer. (You
may, though not always, encounter problems if you use a T-switch
to switch between computers and printers since cable lengths are
effectively doubled.)
COPYRIGHT © 1993-2000 Graham
Woods All rights reserved.