|
Karei VTPR from France by
|
|||||||||||||
|
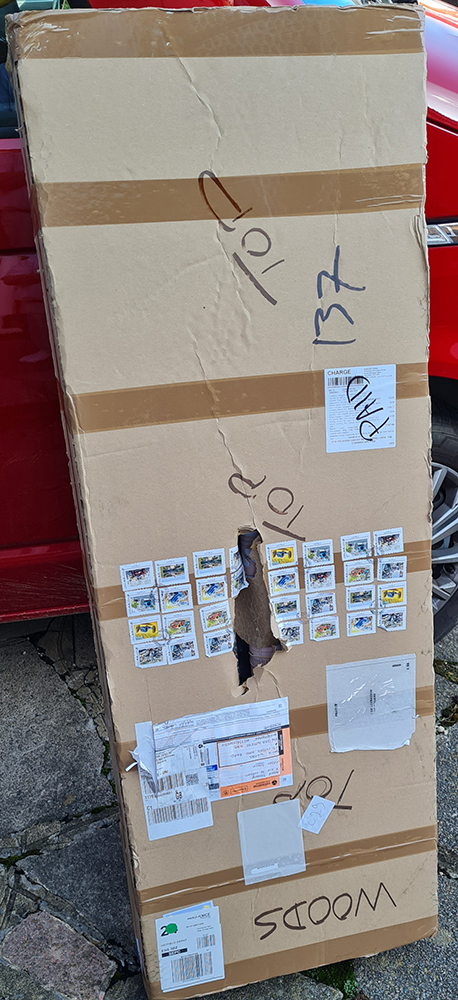
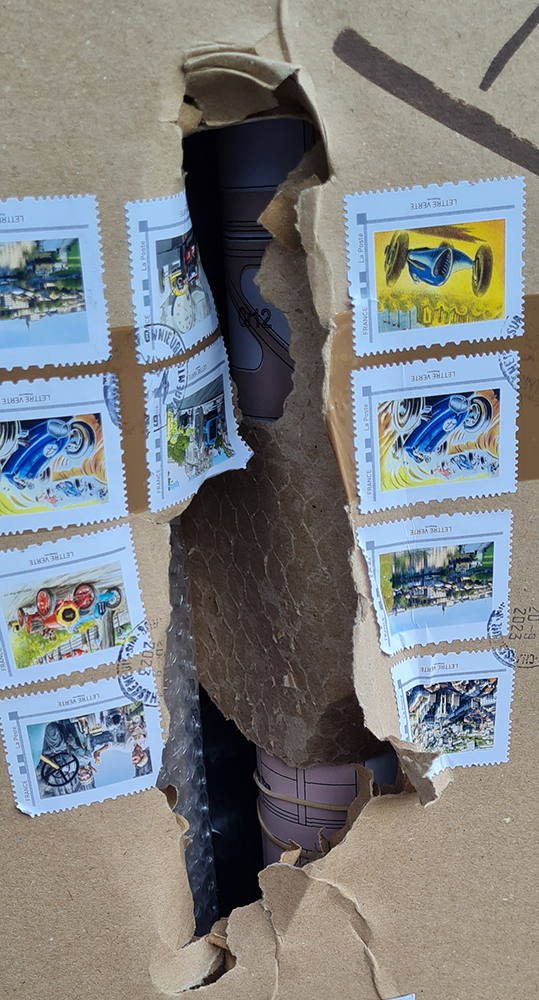
"I wanna tell you a story..." The order went through OK and the money was paid. We had a tracking number from Collisimo in France who immediately handed it over to Parcel Force, one of their UK agents in France. It didn't start well. After 10 days the box arrived at the door from France, 20% VAT, Import Duty (2%) and Parcel Force's £12 'hole making' charge paid. BUT there was this little problem - this box's huge hole, a 200mm long hole through a 25mm thick layer of corrugated cardboard! There must have been one hell of a bang when something dropped on it! We couldn't really send it back so the delivery driver simply apologised and took a few snaps of it! Luckily, the contents inside were OK, what a relief. Inside, beautiful white fuselages, batches of laser cut balsa and ply sheets, bags of bits and plans. All we needed was six 8 or 10mm servos, an Rx battery, receiver, some covering film and some adhesives and we were set to go. We opted for Oracover Transparent white just like the original.
|
|
||||||||||||
|
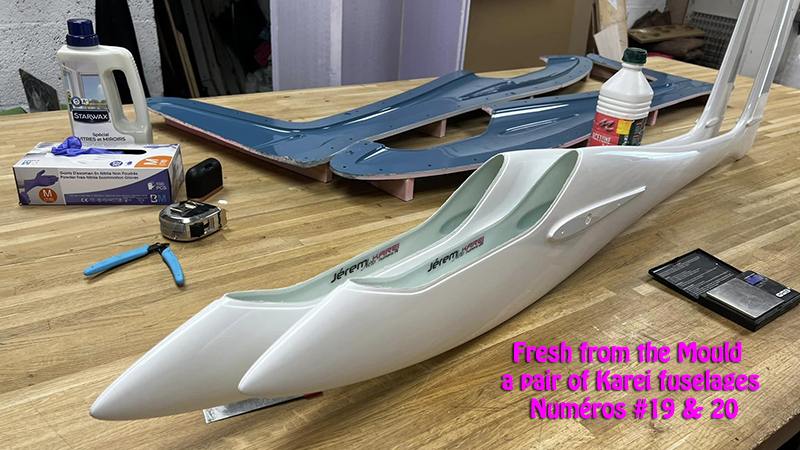
I shall give a images of the build but not a complete report as it has already been done by Jérémy André and his pal Michel Sanchez in a series of 15 YouTube videos. There's loads of stuff on his Facebook and web pages as well. I'm pleased to say that Jérémy actually writes a timetable of his expected build dates so you know where you are when you order. No one will jump the queue it seems, and Jérémy numbers each of his fuselages inside, we have numbers 19 and 20 and he has orders that take him beyond Christmas, I believe. |
||||||||||||
|
A cursory look at the kit shows me that
the flaps are bottom hinged and the ailerons are top hinged. I
believe the original model uses regular Scotch ® tape (in the
tartan box) for these hinges. The rudder has four, regular plastic hinges
and has a supplied closed loop system. The elevator has a conventional
fibreglass CNC cut bellcrank with carbon pushrod. This is
included and IMHO the best solution for all surfaces.
You will need thin wing servos and a battery and receiver, of course. The wing servos exit the wing from top (flaps) and bottom (ailerons) and you will need to fashion some servo mounts and covers from plastic or ply. (I hate fitting wing servos, BTW). Servo choice is option and although Jérémy and Michel opted for pricey MKS types I guess most of us will choose KST or cheaper. I should think up to 12mm for flaps, 10mm for ailerons, should fit, I don't know yet. Being such a lightweight model weighing under 2kg servo power isn't really going to be a concern. I'm hoping this will be a great alternative for the Raptor on light wind days. It even uses the same TP42 section.
|
|
||||||||||||
|
Hopefully then, the Raptor for so called 'ballistic' flying and the Karei for close-in VTPR... if you don't already know: VTPR ça va dire: « Voltige Très Près du Relief » |
|||||||||||||
|
|
Mid-October and bro and I started building; that means the Rudder and Elevator to start then the wings. Fortunately, we had the videos by Michel and Jérémy to watch so we knew exactly what to do, without these with just the plan to go on it would have been a little more difficult. Problems: we had a little one - the laser-cut pieces didn't quite match up with the plan but this is not really an issue for experienced modellers, of course. I believe the reason is that when a large plan is copied or printed the copy paper can stretch. While I love the canopies one of them was a bit sub-par where the fabric appears to have not wetted out properly but no matter, you can't see it from the air. Mine, the poorer one, is shown below, I dodged showing the errors. |
||||||||||||
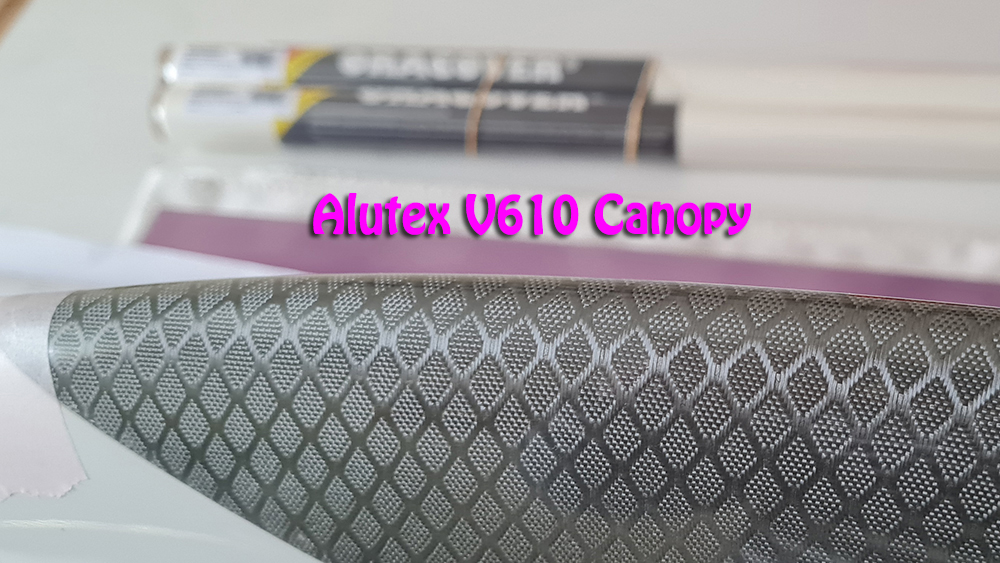
| I had
never seen glass cloth like this before, it comes in a series of
decorative, patterned fabrics for moulding, hand laminating or by
vacuum infusion. It is Italian (https://www.G-Angeloni.com) and a little
research shows it's called Alutex, this version is called
V610 (200gsm) and has, as you would expect, something to do with
aluminium. It's certainly eye catching.
The canopy was a perfect fit, so none of that awkward cutting to fit. All this one needs is a sprung piece of piano wire or a thin carbon rod glued inside to do the job. |
. |
||||||||||||
|
|
|||||||||||||
|
http://favonius.com/soaring/Flashing%20leds/10_watt_flashing_l.htm |
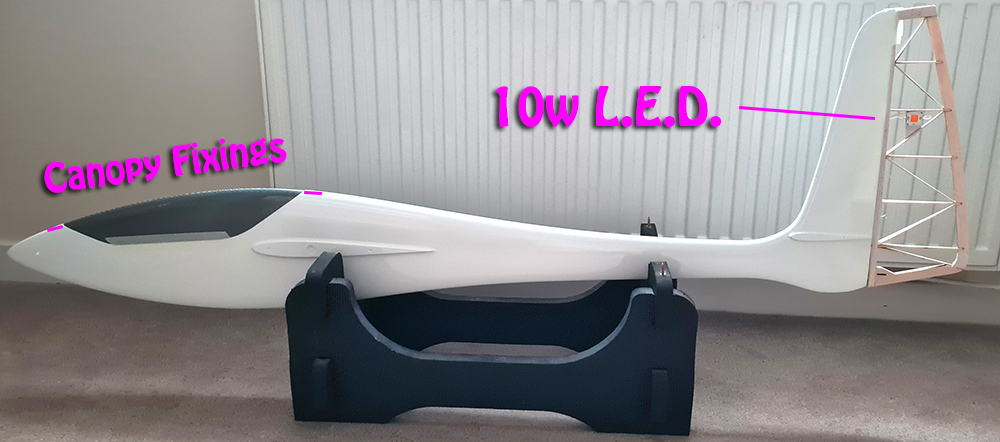
Progress is slow, I'm taking my time. A springy piece of 2mm carbon rod just over 400mm was glued to the inside of the canopy with, at first, cyanoacrylate to hold it, then 24hr Araldite. You can't see it but it protrudes about 10mm at each end so that the canopy can be slid on and off - no tape hopefully will be needed. Also, as you can see I added a 10w full spectrum l.e.d. mounted on each side of the rudder. Naturally, the rudder will be covered with transparent white Oracover and its 1000 lumens brightness will shine through. The wire is in place and it will be powered by a small 4S Lipo used to balance the model instead of lead. .
|
||||||||||||
| I made
some progress; the elevator just needs a final sanding before I can
cover it with Oracover, although this cannot be done until
the wings are finished and fitted to the fuselage. This is in case
the tailplane needs some sanding adjustment at the root for a neat
fit to the fuselage sides when the bellcrank assembly is fitted in
place and the wings and rudder aligned at 90º.
As it sits here in the image, without carbon dowels, it weighs 33g. The rudder shown above, btw, uncovered but with the two 10w l.e.d.s fitted weighs just 13g.
|
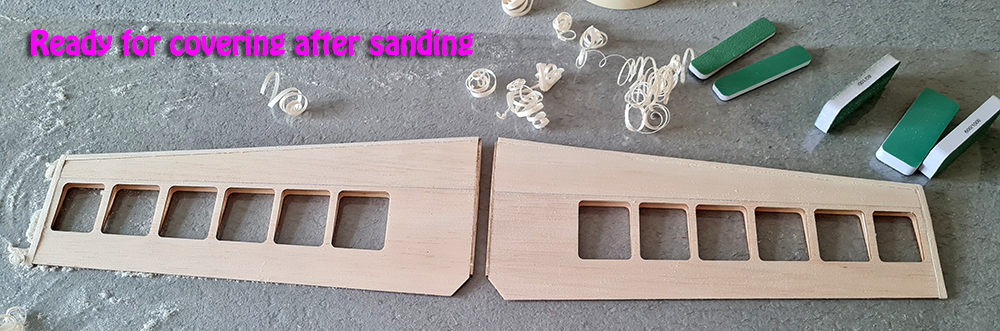
(Tip: here the six excellent little green foam 90mm sanding blocks with different grades of sandpaper 60, 100, 240, 400, 600,1000 grit per side came from https://www.hobbies.co.uk ) |
||||||||||||
|
|
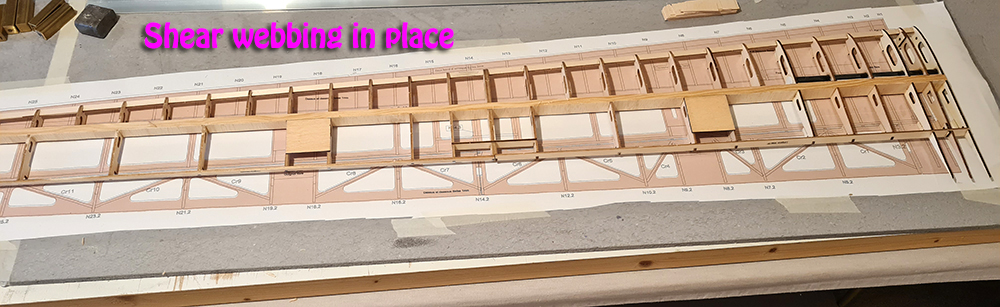
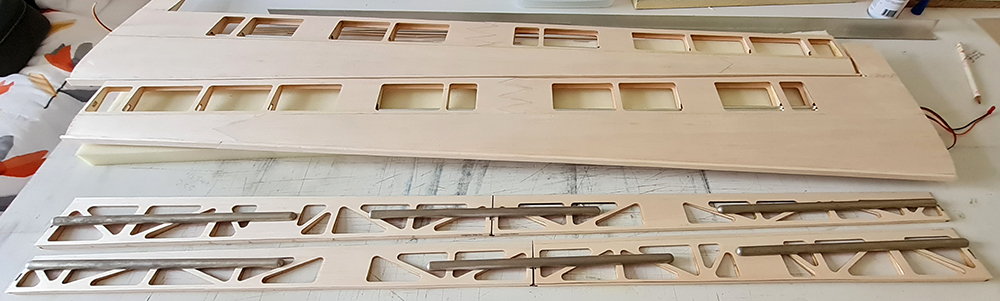
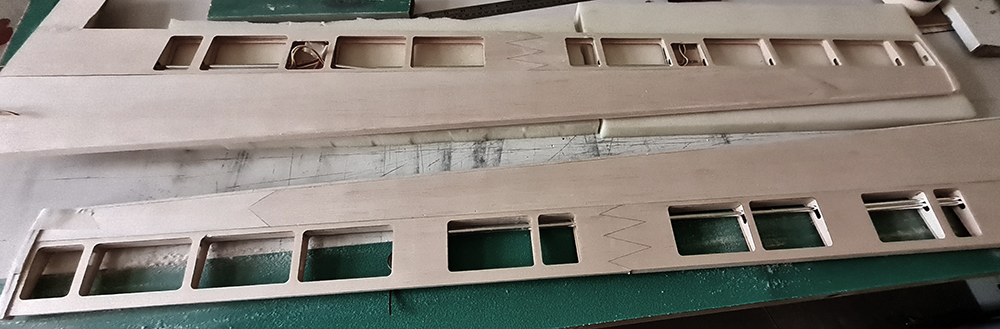
The wing assembly was straightforward, you just have to keep it flat and not break any of the little supporting tabs to keep the wing 'flat' on the ribs! The biggest pain are the pieces of 1mm shear webbing that have to be cut and fitted, the are 43 pieces on each wing panel... and they're not all of equal size! Jérémy and Michel use cyano to glue these in place - I did use cyano in some places but I preferred to use Super'Phatic adhesive instead. I glued the wing dowel tube in place with 24hr Araldite. |
||||||||||||
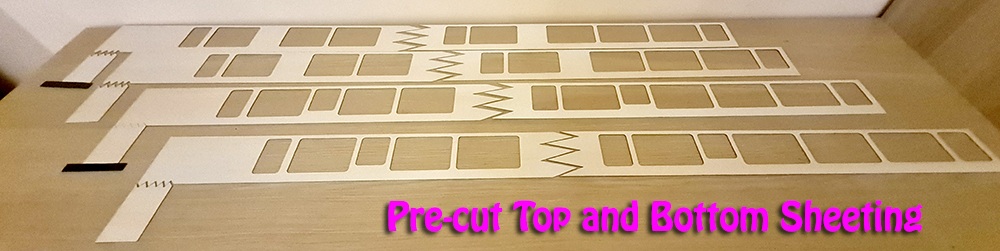
| Next
step for this panel is the sanding the spar, shear webs and ribs and
generally removing any high spots from the adhesive etc. to take the
pre-cut top sheeting. This is very delicate work because the
sheeting is 1mm soft balsa to keep the whole model very light and is
very easy to put break or put your finger through. The 4 additional
sheets of 1mm x 100mm x 1m 1mm supplied were only just enough to
cover the wing. A 1mm sheet of balsa for the shear webbing was
omitted. The built-up ailerons and flaps look like a pain as well.
|
|
||||||||||||
|
|
So it was a pain, 86
little pieces of vertical grain balsa glued between the ribs. They
were all cut oversized and had to be cut and sanded after gluing. I
can tell you that cutting the excess with a scalpel was difficult as
the glue is so hard. |
||||||||||||
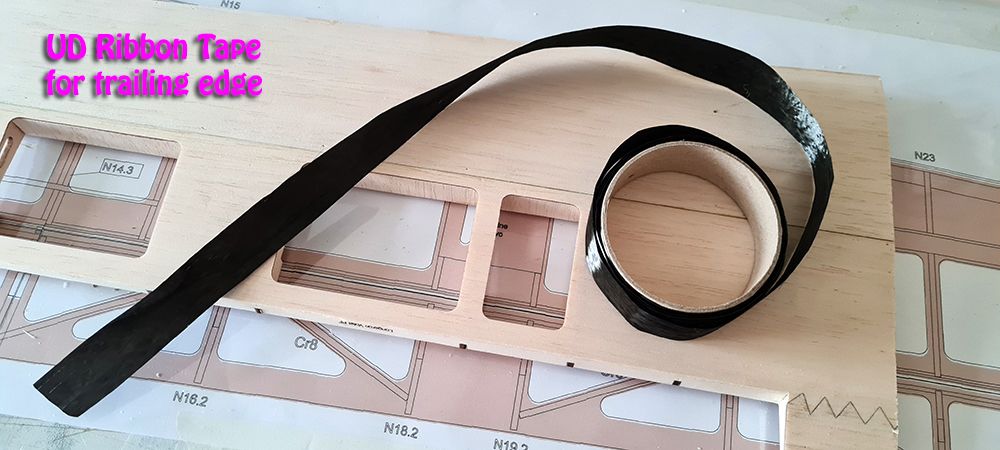
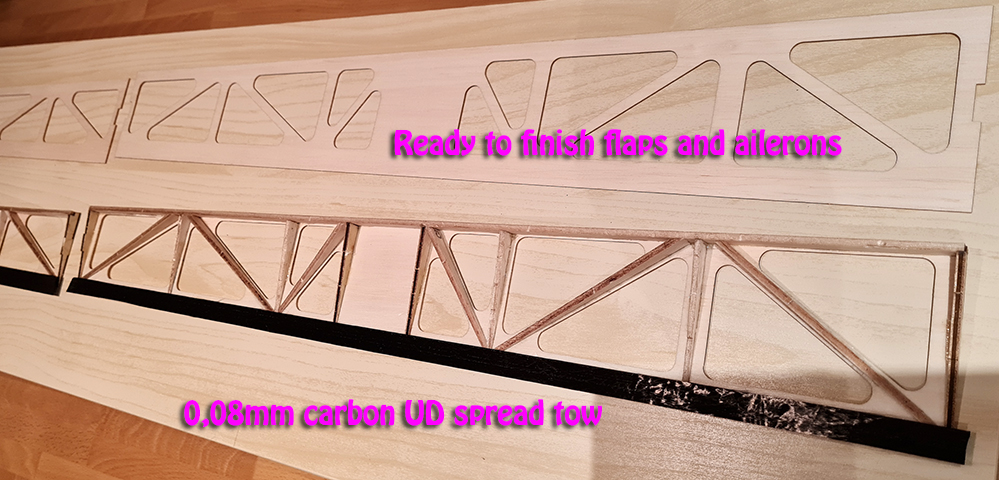
| No, it's
not liquorice, it's unidirectional (UD) carbon. Imagine 12k carbon
tows laid perfectly flat... well, there it is. Its thickness is only
0.08 mm and its weight is 80 gm-². It is 15k and is available in two
widths of 15mm and 25mm and in rolls of 10m, 50m and 100m. I'm going
to sandwich it between the upper and lower surfaces of the flaps and
ailerons. This will keep the trailing edges stiff, hard and
straight. https://www.easycomposites.co.uk/80g-15mm-carbon-fibre-spread-tow-ribbon. |
|
||||||||||||
|
|
I
finished the main wing panels, and started on the flaps and
ailerons. The ribs and diagonal cross-pieces are a little bit fiddly
but all the pieces a slot together nicely so it's relatively easy.
Just a couple of other things - I ended up with a couple of spare
ribs N17.2A, they seem to be a simple design mistake but they had me
puzzled for a while.
And one other thing - the aileron and flap longerons taper to the wingtip so make sure to get them in the correct orientation - I know it's obvious but it caught me just before the gluing. In fact, I did make a serious error from which I recovered - clue - left and right and top and bottom!
|
||||||||||||
|
Having a break: Top sheeting was added to flaps and ailerons including a carbon ribbon on the t.e. I added the 4mm leading edge balsa strips and I forget to mention that I also added paper straws between the ribs for the internal servo wires in the wings. This pretty much covers all the woodwork. I also removed the l.e.d. from the inside of the rudder and put it in the fin so I will have to re-cover the rudder once again. Now it's sanding time (poncing about as the French might say ;-) I decided to use the Jérémy way by clamping my green roll of 100mm wide sandpaper to the bench (the mountain to Mohammed as Francis Bacon said in 1625) and moving the wing back and forth, a clever idea really. I don't really like sanding... (btw Poncer is the French word for to sand)
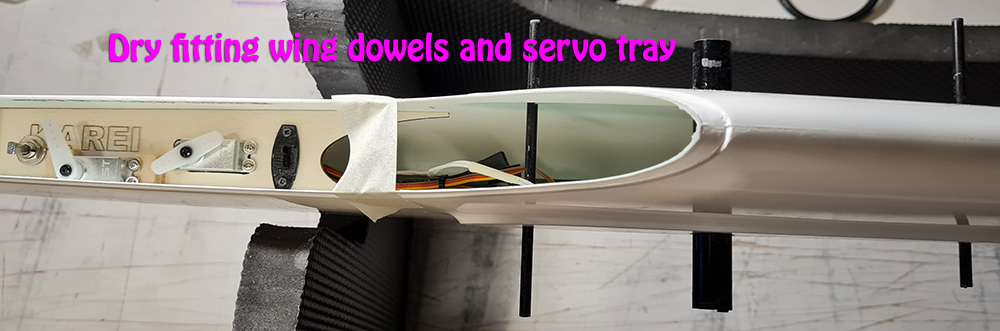
I decided to glue the five bellcrank parts together and drill out the holes in the fuselage as shown in the Karei Construction videos on YouTube. It's a good idea to 'dry-fit' the tailplane, dowels and bellcrank before gluing! It was relatively straightforward except to be careful with the cyano glue! Here I used my eye and the radiator to line my tailplane and fin. I made a fairly good job of it because there were no dramas. Next thing is to put the wing dowel tubes in the fuselage followed by the servo tray. |
|||||||||||||
|
|
I used a Dremel to cut these holes but remember the fibreglass of the fuselage is very thin. I dry-fitted the tubes and servo tray to check their alignment. After gluing these pieces, I shall glue the rudder post in place. N.B. the plywood internal ribs are very important to align everything so do not modify them in any way. You fix these in place then modify the wing towel tube holes to get it square if necessary. I thought I had everything straight and at right angles but somehow I am a degree or so off on the wing/tail alignment. |
||||||||||||
|
Not only did I have a problem with
alignment but I also had trouble with the wing fitting; the fuselage
tapers at the wing root while the plan appears to show the main wing
dowel at right angles. Maybe it's my building but 'building fatigue'
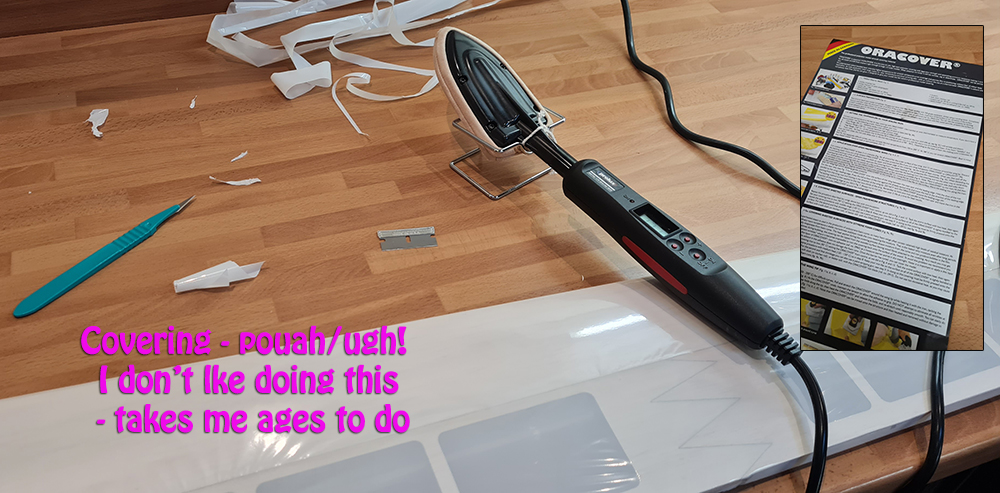
set in and I took a break from it... It's been a while but I couldn't put it off any longer - covering with film - 1.2m is a long piece polyester film that wants to stick to itself, and then there is static electricity as well! I bought two rolls of 2 metres so there should be enough. Anyway, I bit the bullet and started today on one of the wing panels. I even read the instructions in case I ruined it and had to but another roll of £25+ of Oracover transparent plus shipping!
|
 |
||||||||||||
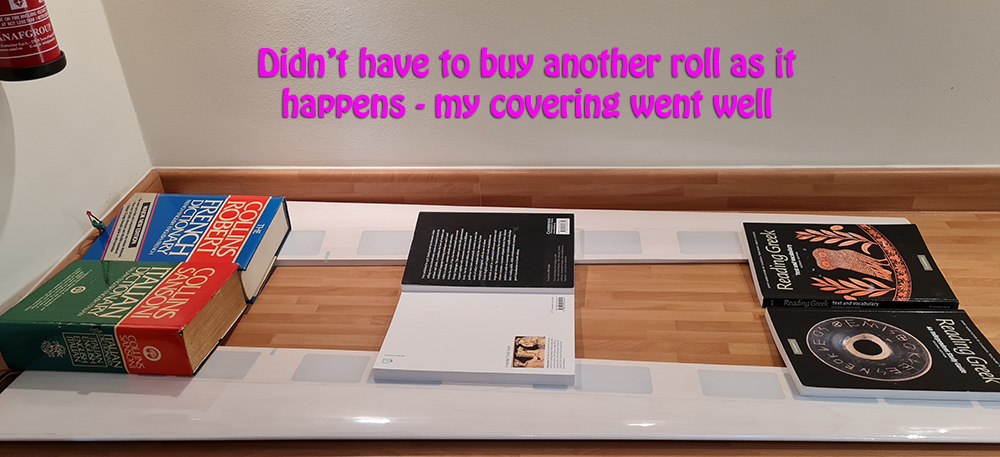 |
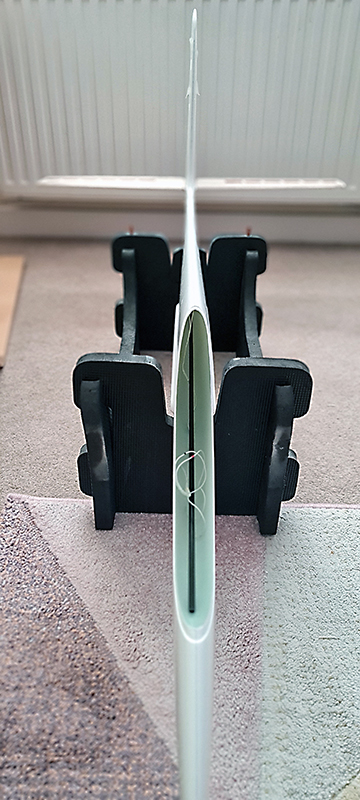
So, I finally finished covering my Karei, Bro, on the other hand actually finished his model - below. My Karei will be somewhat heavier since I added six 10 watt l.e.d.s along with their wires and associated l.e.d. drivers. That is two in each wing and one on either side of the fin. I reckon the 4S 450maH 80C LiPo battery driving these lights will replace the 80g of noseweight bro used to balance his model. I'm using a similar receiver battery and the Rx shouldn't be too different as I'm using Crossfire 868MHz and he uses Jeti 2.4GHz. | ||||||||||||
|
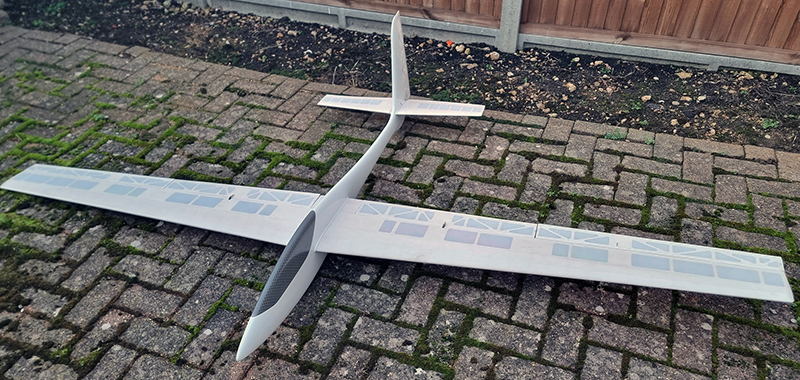
David has yet to decorate his 'naked' Karei but he did take some measurements. It came out at 1320grams! with a surface loading of 25.6g/sq.dm (8.35 oz/sq.ft.) incredibly light for a 2.5m span model. With a pair of 18650, 3400 maH LiIon cells he set his C.G. at 122.1mm by the addition of 80g of noseweight made from 2mm Tungsten balls in the nose. I think this could be a little too light but we'll see how his model flies. Hopefully, over the Christmas holidays. |
|
||||||||||||
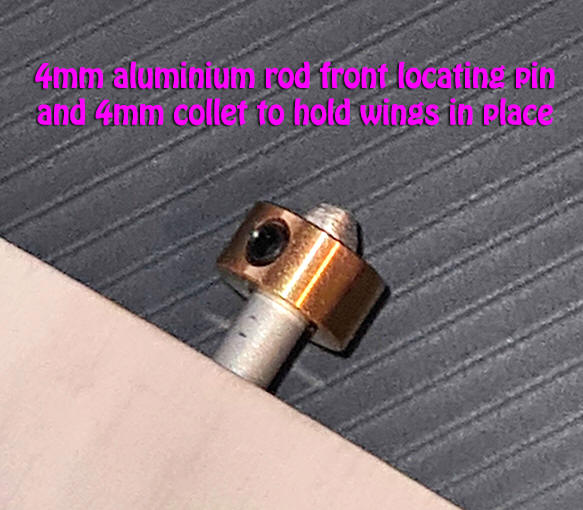 Progress has been slow of late, (it's now mid-December). The only thing I have done is to make the flap and aileron hinges using Scotch tape and I mounted the four servos in the wings. I also made the flap and aileron clevises adjustable by using 2mm threaded rod in place of the carbon rod supplied. The next item on the agenda is programming the aileron/flap butterfly braking and thermal and reflex flap settings - I always find this difficult. I decided to replace the carbon locating pins at the front of the wing root with 4mm aluminium rod and then use a 4mm wheel collet to hold the wings in place; it has a grub screw that bites into the rod. I hope I don't wreck the wing root with a bad landing! |
|||||||||||||
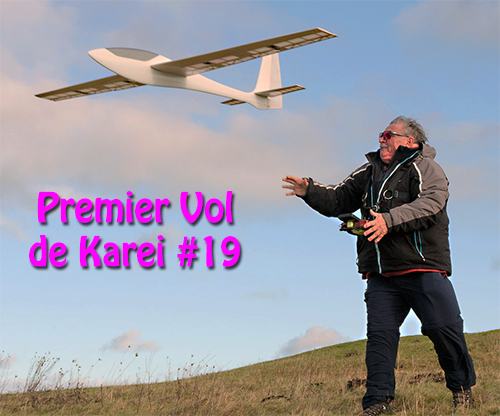
|
Yesterday, David had his first flight on the Beacon with his lightweight Karei (1340g) It was a bit too windy at around 20mph. Loops and outside loops were great, so too were stall turns but the roll was very disappointing. He didn't have anywhere near enough down going aileron but he has already set about modifying his mistake. Altogether, an excellent aerobatic for those light wind days. There is a 25sec video clip on Jeremy's Facebook page of some of of the first flight. Myself, I have finished the wing servo installation so now the end is in sight. We have a vinyl cutter so some decoration is in order but what colours and designs. Click on the image (right) for a no wind video. |
|||||||||||||
|
|
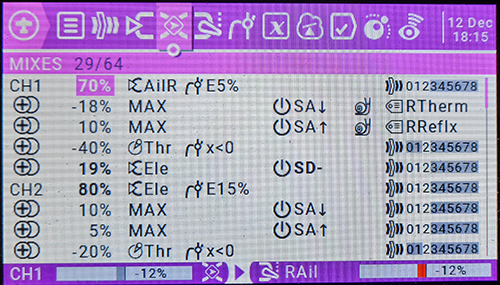
I finally finished most of the work on
my Karei. I did my quirky programming: ailerons, rudder, elevator,
butterfly, reflex flap, thermal flap, flap snap and my three regular
modes of normal, aerobatics and landing - looks like 64 'mixers' at
the moment and I'm quite conservative! I'm still using OpenTx since
I haven't swapped over to EdgeTx and I'm using the TBS Crossfire
868Mhz module since the TBS Tracer doesn't offer an 8 channel
receiver. So, before my 'decorations' I ended up with a nominal
flying weight og 1420 g, not bad considering I added a 4S LiPo and
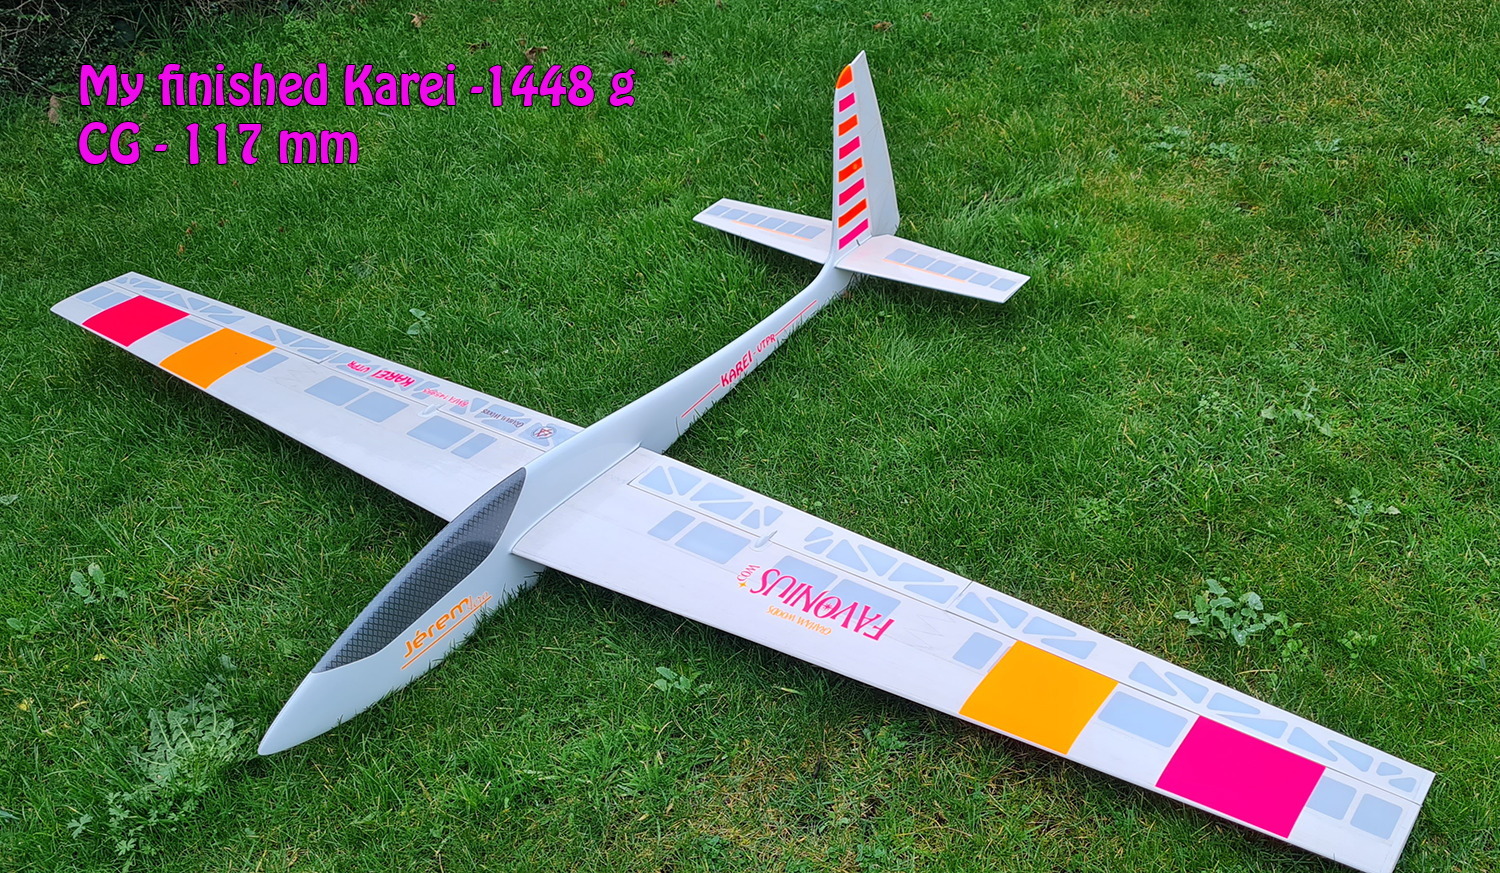
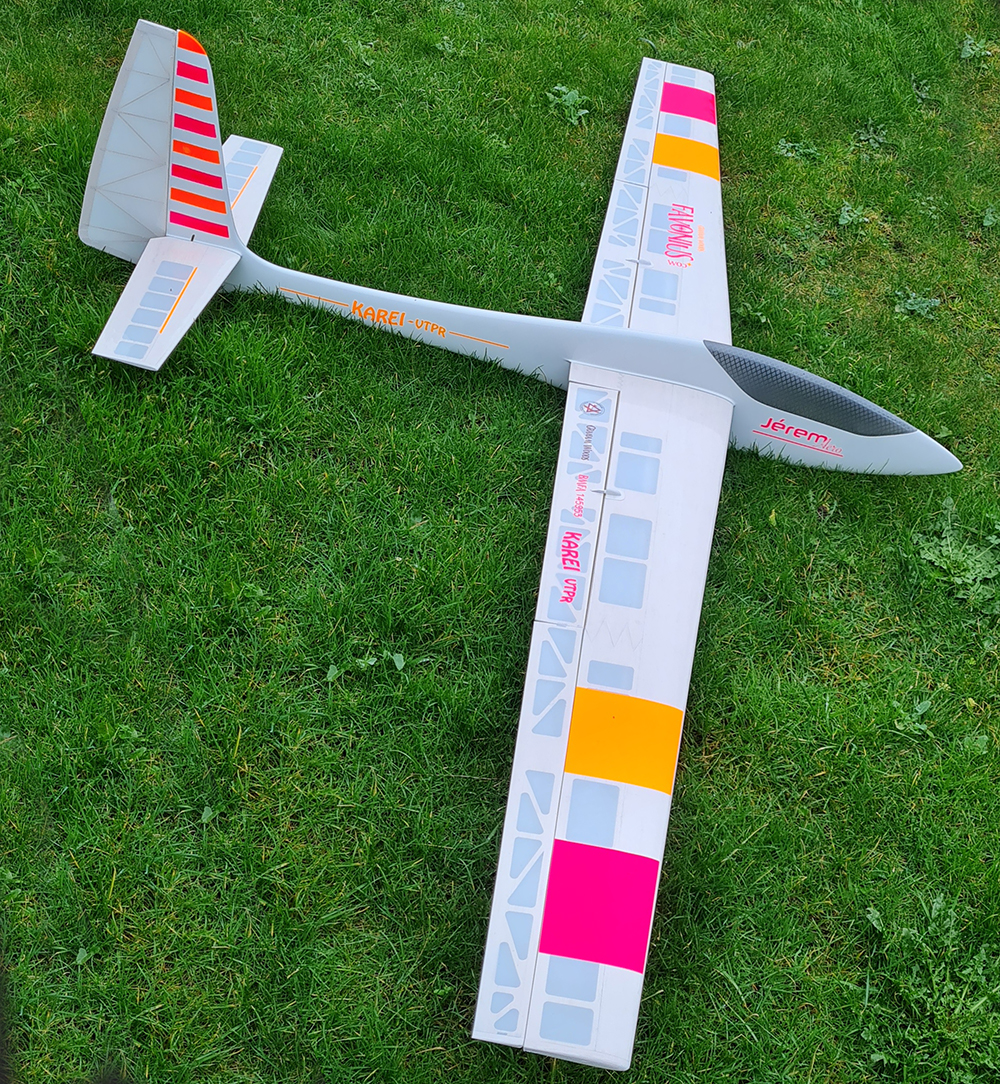
10w leds with PCB drivers and extra cabling. I'm just waiting for my brother to bring his glider balancer scales and Vinyl cutter to finish off my model. I should be comfortable below 1450g. Looking forward to a nice flying, light wind, bright day with a temperature of at least 10ºC. Voilà numéro 20 !
|
||||||||||||
|
|
|||||||||||||
|
|
|
||||||||||||


